In a nutshell
- 🧽 Baking soda brightens grout fast through mild abrasion and optional fizz, lifting embedded grime in about 60 seconds.
- ⏱️ Step-by-step: make a 2:1 soda–water paste, apply thinly, optionally mist with vinegar or use hydrogen peroxide, scrub 30–45 seconds, then rinse and dry.
- ⚗️ Science: sodium bicarbonate particles polish without scratching; acid contact releases CO2 bubbles that lower surface tension and dislodge residue.
- 🚫 Safety: avoid acids on natural stone, use nylon brushes, spot-test coloured grout, and never mix vinegar with bleach.
- 🔁 Maintenance: match mixes to stains (soap film, mineral haze, mildew), reseal when water stops beading, and do quick weekly refreshes for lasting brightness.
Grimy grout dulls a sparkling bathroom faster than steamed-up mirrors, yet the fix can be refreshingly simple. With a teaspoon of baking soda, a dash of know-how, and a firm brush, you can lift embedded dirt in as little as 60 seconds. The trick is twofold: gentle abrasion scours the top layer of soil, while a quick fizz—when bicarbonate meets a mild acid—helps dislodge residue lurking in pores. It’s safe on most cement-based grout, cheap, and oddly satisfying. Short effort, fast payoff. For everyday soap scum and light mould staining, this method is a reliable first resort before harsher chemicals.
Why Baking Soda Makes Grout Sparkle Fast
At heart, sodium bicarbonate works because it’s a mild abrasive. The microscopic crystals act like a superfine sandpaper, buffing stained grout lines without gouging the surface. Unlike harsh scouring powders, the particles soften in water, lowering the risk of scratching ceramic glaze. That’s why you can scrub energetically with confidence, especially in tight grout joints where grime accumulates. The second advantage is chemistry. When bicarbonate touches a weak acid—say, white vinegar or lemon juice—it releases CO2 bubbles. Those bubbles disturb film-forming residues, helping grind loosened soil out of pores.
The alkalinity of baking soda also helps neutralise odours and break down oily deposits left by shampoos and body wash. In practical terms, you get two cleaning modes in one: mechanical scouring and gentle effervescence. Used together, they brighten grout quickly, often within a minute on lightly soiled lines. Heavy mildew or deep tannin stains may need a longer dwell or a second pass—speed is impressive, but not magical. Still, for day-to-day upkeep, the soda-fizz combo keeps tiles looking freshly laid with minimal elbow grease.
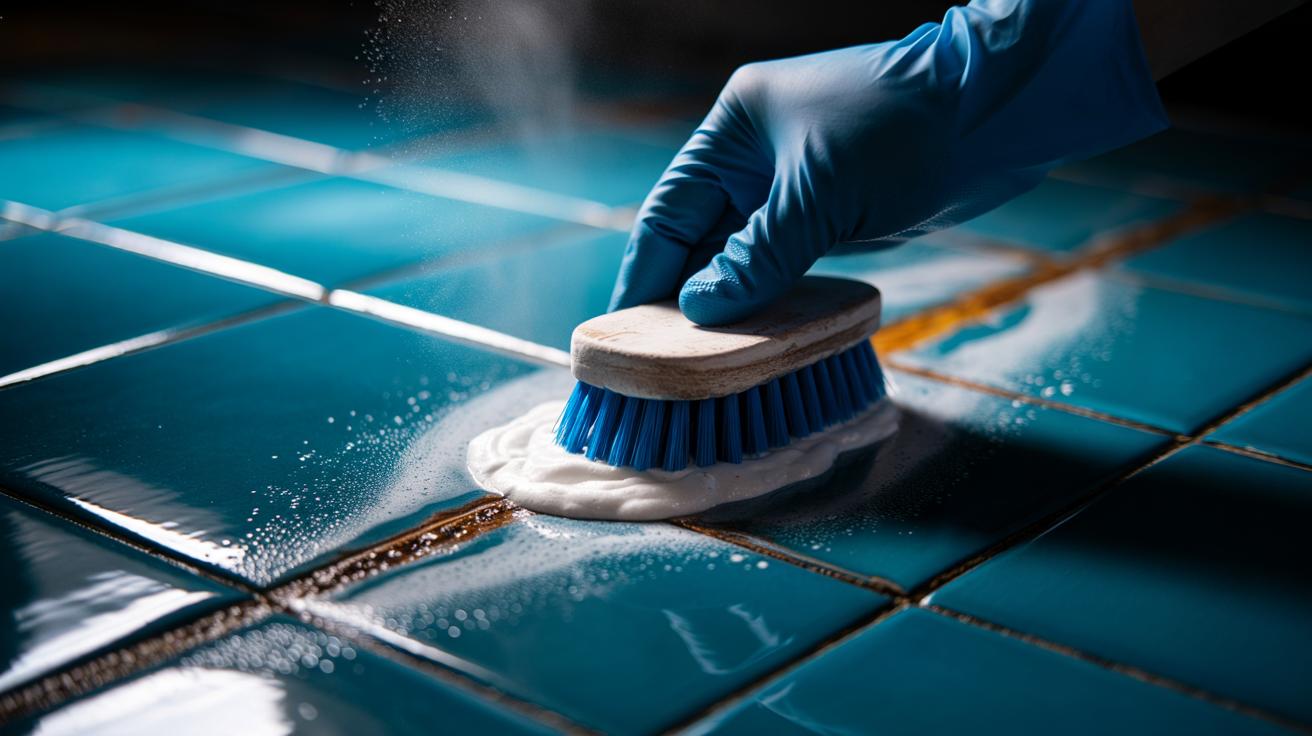
Step-by-Step: A 60-Second Grout Rescue
1. Make a paste. Mix 2 parts baking soda with 1 part water to form a spreadable paste. For greasier grime, add a drop of dish soap to boost slip and lift. Aim for a toothpaste consistency so the paste clings to vertical joints.
2. Apply thinly. Spread along the grout line with a finger or spatula. Too much paste wastes time; a thin skim transfers abrasive where it matters. Always test in an inconspicuous spot first.
3. Optional fizz. Mist the line with diluted vinegar (1:1 with water). You’ll see immediate bubbling as CO2 forms, nudging loose particles out. If you’re cleaning near natural stone, skip acids entirely and stick to water or hydrogen peroxide for safety.
4. Scrub for 30–45 seconds. Use a stiff nylon brush or an old toothbrush. Short, fast strokes across the joint, then along it. The goal: agitate the abrasive into the pores without shredding the grout.
5. Rinse and buff. Wipe with a damp cloth, then dry with a towel to prevent chalky residue. Never mix vinegar with bleach-based products—dangerous fumes can form. If shadowing remains, repeat once or switch to a peroxide pairing.
The Science: Abrasion Meets Fizzing Chemistry
Grout is typically a cement-sand matrix with open pores; it traps soap scum, skin oils, and mineral film. Baking soda’s particles, roughly 70–160 microns, are large enough to abrade residues yet soft enough not to scratch ceramic glaze. That’s the mechanical win. On the chemical side, sodium bicarbonate is a weak base (pH ~8.3 in solution). It neutralises light acids in bathroom grime and, when contacted with a mild acid, produces carbonic acid that decomposes into CO2 and water. Those bubbles don’t “blast” dirt, but they reduce surface tension and help undermine sticky films.
Additives fine-tune results. A drop of surfactant (dish soap) helps emulsify oils so abrasion doesn’t just smear them. Hydrogen peroxide (3%) adds gentle oxidation, brightening organic stains without harsh odour. The balance is key: too much acid cancels alkalinity and can etch sensitive stone; too little agitation and you lose the mechanical advantage. Short contact plus energetic scrubbing beats long soaks in most grout-cleaning scenarios. Think of it as targeted micro-polishing aided by fizz-driven loosening—fast, controllable, and friendly to routine maintenance.
| Mix | Primary Action | Best For | Contact Time | Caveats |
|---|---|---|---|---|
| Baking soda + water | Mild abrasion, light alkalinity | Everyday soil, soap film | 30–60 seconds | Rinse well to avoid residue |
| Baking soda + vinegar spray | Effervescence + abrasion | Mineral film, dulling haze | 30–90 seconds | Not for natural stone surfaces |
| Baking soda + 3% hydrogen peroxide | Oxidation + abrasion | Mildew marks, organic stains | 1–5 minutes | Test coloured grout for lightening |
| Baking soda + dish soap | Degreasing + abrasion | Shampoo/oil residues | 60 seconds | Rinse to prevent slickness |
Safety, Surfaces, and Stain Types
Do not use vinegar or any acid near marble, limestone, or travertine—etching is permanent. For those surfaces, pair baking soda with water or peroxide only. Use nylon brushes; wire can gouge grout and invite future staining. If your grout is coloured, spot-test peroxide mixes to check for lightening. Sealed grout cleans faster, but aggressive scrubbing can abrade sealer; if water no longer beads, it’s time to reseal. Ventilate well in compact bathrooms and wear gloves if you have sensitive skin.
Match stains to methods. Grey soap scum? Soda plus dish soap. Pink biofilm or light mould spotting? Soda with peroxide. Mineral haze from hard water? A brief fizz with vinegar—on ceramic only. Persistent black mould suggests deeper moisture problems; address ventilation and leaks rather than cleaning alone. After cleaning, squeegee tiles, keep joints dry between showers, and schedule a weekly 60-second refresher. That cadence preserves brightness and slashes the need for heavy-duty treatments, keeping both your lungs and your tiles happier in the long run.
Baking soda’s appeal is simple: low cost, high control, swift results. Used smartly, its gentle abrasion and optional fizz will revive grout lines while sidestepping the harshness of strong bleaches or acids. Tweak the recipe to the stain, keep brushes firm but not brutal, and respect surface sensitivities. Your bathroom will thank you, and your cleaning time shrinks to a minute a day. Ready to try the 60-second rescue, or will you experiment with a peroxide polish to chase stubborn spots—what’s your game plan for brighter grout this week?
Did you like it?4.4/5 (24)