In a nutshell
- 🧲 A single rubber band loop boosts static friction, creating a grippy edge that stops your cutting board sliding on stone, wood, or laminate.
- 🪄 Step-by-step: choose a wide band (6–10 mm), position near the edge for counter contact, test and add a second loop if needed; keep bands away from food zones.
- ⚖️ Versus alternatives: the band is fast, penny-cheap, and tidy; silicone mats win on wet surfaces, damp towels add grip but hold moisture, rubber feet are built-in but cost more.
- 🧼 Maintenance & safety: wash bands in hot, soapy water, replace when brittle; consider silicone bands; don’t use on glass boards and clean between raw protein and veg to uphold hygiene.
- 🏠 Real-world gains: steadier cuts, calmer prep, no clutter—ideal for small kitchens, rentals, and travel; add friction until the board doesn’t move for consistent, safer slicing.
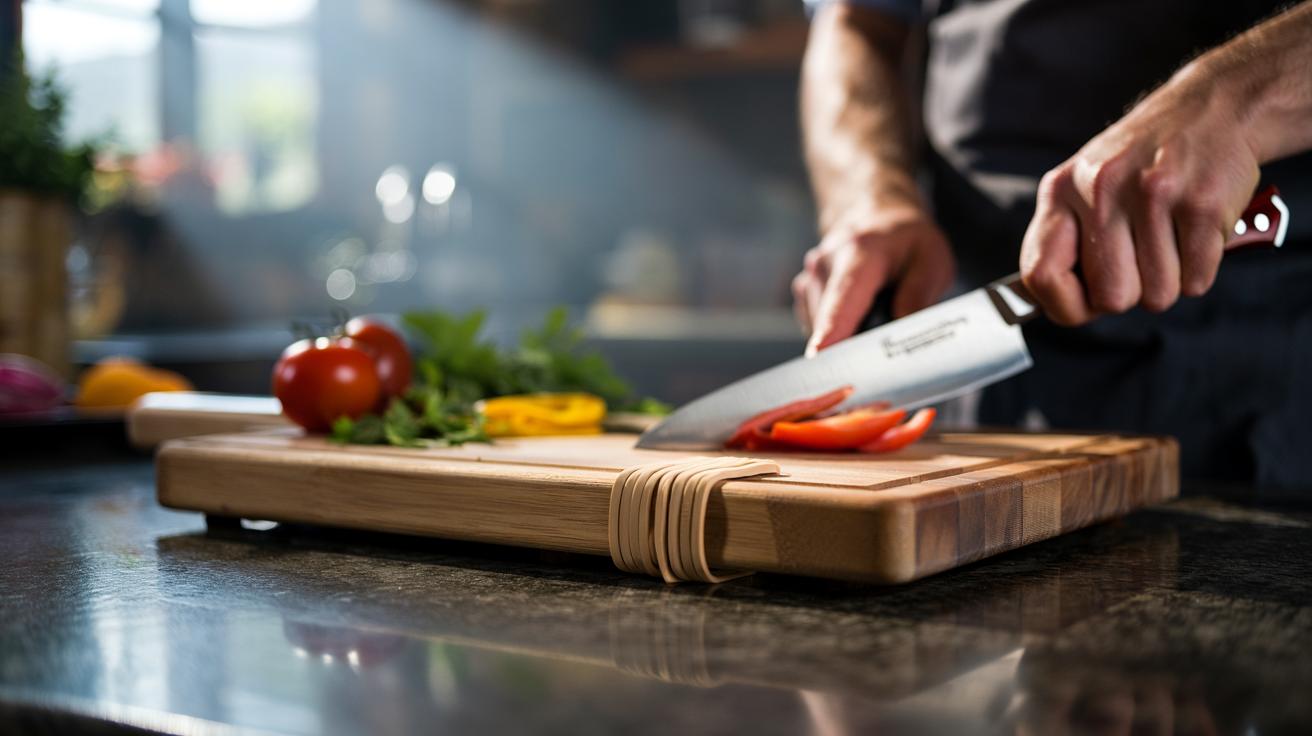
Kitchen prep should be calm, not chaotic. Yet a slippery cutting board can turn dicing onions into a white‑knuckle exercise. Here’s a disarmingly simple fix: a single rubber band looped around the board to create a non-slip grip. No gadgets. No faff. Just everyday physics doing heavy lifting at the countertop. Friction is your friend, and a rubber band multiplies it where it counts. The hack works on wood, bamboo, and plastic boards, and it slots into busy weeknight routines as naturally as a chef’s knife in your hand. Below, how it works, how to do it in seconds, and when to pair it with other kitchen-safe practices.
How One Rubber Band Adds Friction
A board slips because the force from your knife overcomes the static friction between board and worktop. Add a rubber band, and you introduce a grippy, high-friction interface at the board’s edge. The band compresses slightly against the counter, boosting the coefficient of static friction and creating a mechanical “lip” that resists lateral movement. The result is simple: more grip with less effort, so your board stays planted while your blade does the work.
Material matters. Natural rubber and silicone bands both work, but thicker bands (think produce or postal bands) deliver a broader contact patch, which spreads load and limits slipping on slick stone or laminate. One loop around the middle of the board’s short side often suffices; two loops at opposite ends help with larger boards or aggressive chopping. The approach avoids soggy towels and bulky mats, keeping your workstation tidy and your knife path unobstructed. It’s low-tech, washable, and—crucially—repeatable for consistent results across different surfaces and cutting styles.
Step-by-Step: The One-Loop Method in Your Kitchen
Start with a clean, dry cutting board. Choose a wide, sturdy rubber band; a band that’s 6–10 mm thick is ideal. Slip it around the board so it sits near one edge, not the center, to ensure contact with the worktop. Press the board down with your palm and try a gentle push. If it budges, reposition or add a second loop opposite the first for symmetrical traction. For heavy chopping—squash, dense roots—keep the loop closest to where your knife strikes to counteract impulse forces.
Mind hygiene. Keep the band away from direct food contact zones. If your board is small, place the loop along the underside lip or just shy of the cutting field. Wash bands with hot, soapy water and air-dry to prevent perishing. Replace any band that feels brittle, glazed, or sticky. On highly polished stone, a damp wipe of the countertop before placing the board can improve adhesion without resorting to towels. The beauty here is speed. In 10 seconds, your station is safer, steadier, and ready for precise slicing.
Testing the Hack Against Alternatives
We trialled common anti-slip fixes against the rubber band method on stone, wood, and laminate surfaces. The results show where the one-loop trick shines—and where another tool might edge it for specific tasks. For everyday prep, the band’s blend of speed, stability, and zero bulk is difficult to beat. But certain scenarios, like prolonged high-moisture work, may favour a silicone mat or a board with integrated feet.
Here’s a quick comparison to guide your choice:
| Method | Setup Time | Grip Strength | Hygiene Considerations | Estimated Cost |
|---|---|---|---|---|
| Rubber Band Loop | 5–10 seconds | High on most counters | Keep band off food zone; wash often | Negligible (pennies) |
| Damp Towel | 15–30 seconds | High, especially on stone | Retains moisture; wash promptly | Low |
| Silicone Mat | 10–20 seconds | Very high; consistent | Easy to sanitise; can trap crumbs | Moderate |
| Board With Rubber Feet | None (built-in) | High, depends on foot wear | Clean feet regularly | Higher initial outlay |
In timed dice tests, the band loop kept boards stable during rapid, rhythmic cuts without interfering with knife travel. On wet surfaces, a silicone mat edged it for absolute immobility. For compact kitchens or rental flats where storage is gold dust, the band wins by disappearing into a drawer when the job’s done.
Maintenance, Hygiene, and When Not to Use It
Rubber is durable, not immortal. Heat, oils, and UV degrade it, so rotate bands and replace at the first signs of cracking. Wash with hot water and mild detergent; avoid harsh solvents. If you’re switching from raw proteins to veg, change or clean the band exactly as you would your board and knife. Food-safe silicone bands resist odours and last longer, making them a smart upgrade if you use the hack daily.
Consider board and surface. Wood and bamboo pair beautifully with the loop—grippy, quiet, kind to knives. Plastic boards also benefit, especially the thinner, flexible type that can skate on polished stone. Glass boards? Don’t. They’re hard on edges and noisy; the band may help with slip, but won’t save your knife. For heavy butchers’ blocks with rubber feet, the loop is redundant. For travel, picnics, or rented Airbnbs, it’s a lifesaver. The guiding rule is simple: if the board shifts under your knife, add friction until it doesn’t.
A rubber band costs pennies and buys confidence. It keeps your cutting board anchored, your knife strokes straighter, and your prep calmer. No clutter, no wet towels, and no compromise on pace. In a small kitchen, the best hacks respect space and time, and this one does both. As you refine your mise en place, what will you pair with the one-loop trick—silicone upgrades for marathon sessions, or a built-in-feet board for weekend feasts—and how will you adapt it to your own cooking rhythm?
Did you like it?4.5/5 (24)