In a nutshell
- 🦷 The unexpected tool dentists trust: boil-and-bite mouthguards repurposed as whitening trays, paired with dentist-approved carbamide peroxide gel for safe, predictable at-home results.
- 🔬 How it works: carbamide peroxide breaks into hydrogen peroxide, releasing oxygen to oxidise stains; consistency beats intensity, with sensitivity managed via potassium nitrate/fluoride and a snug tray fit.
- 🛠 Step-by-step: choose a thin single-layer guard, mould and trim carefully, place lentil-sized gel dots, wear for 60–90 minutes, wipe overflow, rinse, and track shade changes with weekly photos.
- 💷 Costs and results: expect £70–£180 for tray plus gel, typically 2–3 shade improvements in 7–14 days, with simple top-ups before events and after stain-heavy weeks.
- ✅ Safety and legality: UK rules cap home-use peroxide (up to 6% hydrogen peroxide via dentists); pause if sensitivity spikes, avoid dubious high-strength OTC kits, and follow a dentist-guided plan.
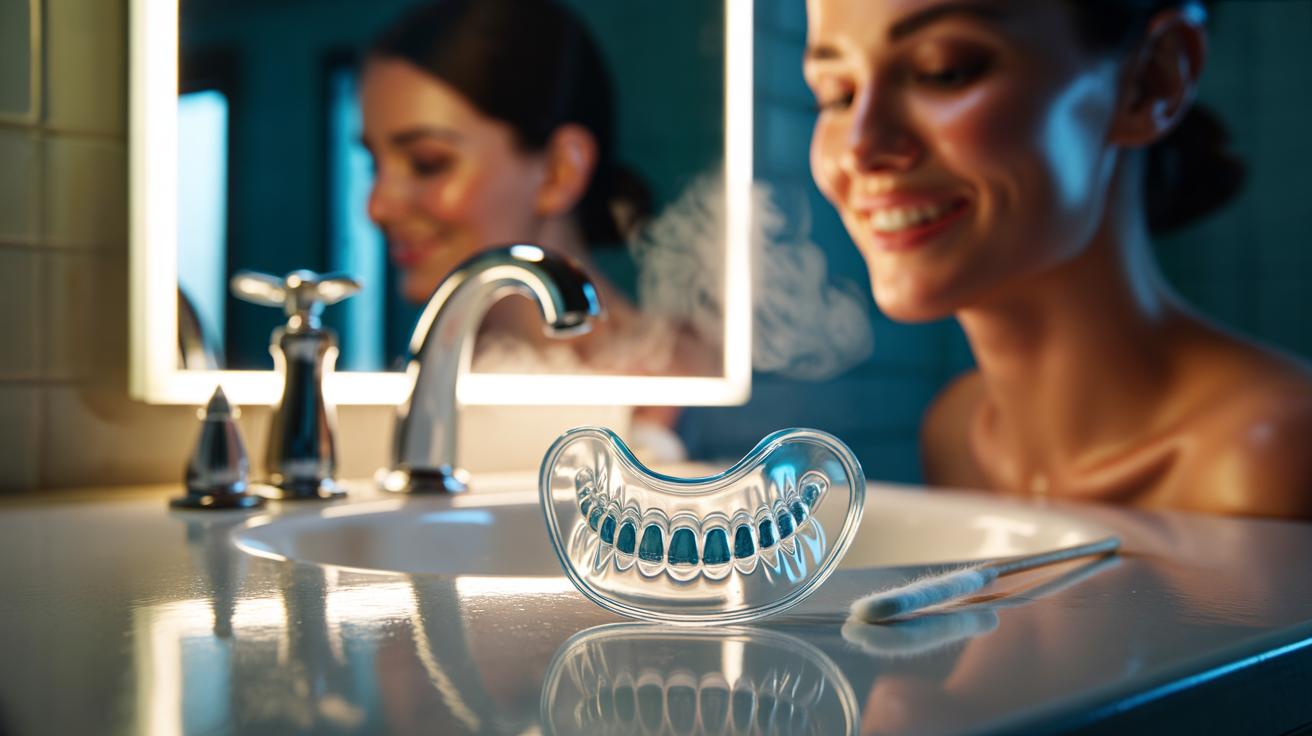
There’s a hush-hush favourite circulating in surgeries across the UK, and it isn’t a flashy light or a viral purple foam. Dentists are quietly pointing patients towards a surprisingly humble helper: the boil-and-bite mouthguard, repurposed as a whitening tray. Paired with a dentist-approved carbamide peroxide gel, this everyday sports essential becomes a precise delivery system that can lift years of tea, coffee, and red wine stains. It’s affordable. It’s controllable. It’s safe when used correctly. And that’s the point: predictable, steady whitening without the salon theatrics. If you’ve been burned by gimmicks that promise miracles, this patient, practical route may be the most unexpected—and trusted—tool in your bathroom cabinet.
The Surprise Star: Boil-and-Bite Mouthguards as Whitening Trays
Open the dental drawer of an experienced clinician and you’ll find custom trays, sure. But ask what they’d suggest to a budget-conscious patient and many will recommend a well-fitted boil-and-bite mouthguard. Designed for sport, these thermoplastic guards soften in hot water and mould to your teeth. Once shaped and trimmed, they double as whitening trays, holding a thin ribbon of gel securely against enamel. That close contact is what unlocks even, controlled whitening. The fit won’t rival lab-made trays, yet it’s often good enough to keep gel where it’s needed and off delicate gums.
Why do dentists trust this approach? Precision and regulation. In the UK, gels supplied by dentists comply with strict rules—typically up to 6% hydrogen peroxide (or equivalent from carbamide peroxide) for home use after a clinical assessment. The guard simply becomes the vehicle: comfortable, low-profile, and cheap to replace if you chew through it. It also lets you pace your whitening: slow and steady for sensitivity-prone teeth, or brisker programmes for stubborn stains, with stop-start flexibility built in.
Cost is the clincher. A sports guard is inexpensive, widely available, and easy to customise in your kitchen. Paired with a reputable gel from your dentist, it’s a credible middle ground between flimsy strips and premium bespoke trays. It feels DIY, but it’s anchored in evidence-based materials. For many households, that blend of practicality and professional oversight hits the sweet spot.
How It Works: Science, Safety, and Sensitivity
Whitening gels rely on oxygen-releasing compounds—most commonly carbamide peroxide, which breaks down into hydrogen peroxide and urea. Those tiny oxygen molecules breach enamel’s microscopic pores and oxidise pigments left by coffee, curry, tobacco, and age. You’re not “bleaching” the tooth structure away; you’re clearing the colourants within it. That’s why results build gradually, night after night, session after session. Consistency beats intensity. Big jumps overnight often indicate dehydration or surface artefacts, not true shade change.
Safety hinges on dose and contact time. UK regulations limit strengths for home use when supplied by a dentist, and reputable gels include desensitising agents like potassium nitrate and fluoride. The aim is simple: enough active oxygen to lift stains without irritating gums or nerves. Using a well-fitted boil-and-bite guard helps here—less wandering gel, fewer “burn” spots, more even coverage. If gel oozes onto the gums, wipe it away immediately. Tingling is common; sharp zings are your cue to pause or reduce frequency.
Sensitivity management is your power tool. Start with shorter sessions, use sensitive toothpaste (high-fluoride), and consider alternating nights. Many dentists advise 10–16% carbamide peroxide for one to two hours daily, while lower concentrations can be worn longer, sometimes overnight, depending on professional guidance. If it hurts, stop and reset the plan. The whitening journey should feel dull and uneventful—because uneventful means controlled and safe.
Step-by-Step: From Mouthguard to Brilliant Smile
First, choose a single-layer boil-and-bite mouthguard (thin, non-bulky). Soften it in hot—but not boiling—water per the manufacturer’s timing. Seat it firmly over your upper teeth, suck down to capture contours, and pinch the front to define the incisal edges. Repeat for the lower if desired, though most people whiten one arch at a time for comfort. Fit matters more than fancy gel flavours. Trim excess plastic so the guard ends just past the last visible tooth, avoiding the soft palate and frenulum.
Next, test the fit dry. It should feel snug and sit without clenching. Now place a tiny bead—think lentil-sized—of dentist-approved gel in the front tooth wells only. Too much gel equals spillage and sensitivity. Seat the tray, press lightly, and wipe any overflow from the gums with a cotton bud or tissue. Set a timer. Stick to the schedule on your gel’s leaflet or your dentist’s plan, typically 60–90 minutes per session for moderate strengths. Short, consistent sessions outperform occasional marathons.
After wear, remove the tray, spit, and rinse your mouth with cool water. Brush gently with a fluoride paste. Rinse the tray with lukewarm water (hot water can warp it), air-dry, and store away from heat. Expect a gradual shift over 7–14 days, with deeper shades needing longer. Stop for a day if sensitivity spikes, then resume at shorter intervals. Photograph your teeth in the same light weekly; objective comparisons beat mirror guesswork every time.
Costs, Timing, and Results You Can Expect
Dentists like predictability. With a boil-and-bite tray plus professional gel, you can chart progress, pause for sensitivity, and top up months later without starting from scratch. Results typically span two to three shade jumps in a fortnight, sometimes more with nicotine or tetracycline staining requiring patience. Tea-drinkers, take heart: lifting tannin stains is where peroxides shine. The economics are attractive too—especially compared with in-practice power bleaching, which often still needs at-home maintenance.
Here’s a snapshot of typical UK scenarios. Figures vary by region and brand, but this gives a useful range for planning and expectation-setting.
| Option | Typical Cost (UK) | Peroxide Strength | Daily Wear Time | Course Length |
|---|---|---|---|---|
| Boil-and-bite + dentist gel | £70–£180 (tray + gel) | 10–16% carbamide (≈3–6% HP) | 60–90 mins | 7–14 days |
| Custom trays + dentist gel | £200–£400 | 10–16% carbamide (or up to 6% HP) | 60–90 mins or overnight (low %) | 10–21 days |
| OTC strips/lights | £20–£150 | ≤0.1% HP (legal OTC) | Varies | Modest, short-lived |
Maintenance is simple: one to three top-up sessions before events, or a mini-cycle after a tea-heavy month. Avoid deep pigments during active whitening—black coffee, red wine, soy sauce—and rinse after. White T-shirt rule: if it stains cotton, it can stain enamel. With care, your tray lasts months; gels store refrigerated between courses. It’s efficient, repeatable, and—crucially—guided by clinical standards.
In a world crowded with neon LEDs and overnight miracles, the modest boil-and-bite mouthguard stands out for one reason: it works, safely and predictably, when partnered with the right gel and a sensible plan. That quiet reliability is why dentists keep recommending it. If you want brighter teeth without the clinic price tag, this trusted tool offers control, value, and results you can actually manage. Ready to mould, load, and time your way to a cleaner, lighter shade—or do you still have questions about fit, sensitivity, or which gel your dentist might endorse for your smile?
Did you like it?4.4/5 (22)